- Knowledge Base
- Creating assessments for delivery in TAO
- Creating deliveries in TAO Authoring
-
TAO Portal Quickstart Guide
-
Rostering in TAO Portal
-
Creating assessment materials in TAO
-
Creating assessments for delivery in TAO
-
Proctoring in TAO Portal
-
Viewing results in TAO Portal
-
How Does Scoring Work in TAO?
-
Writing Your Own Scoring Rules for Your Assessments: An Example
-
TAO Portal Terminology
-
TAO Quickstart Guide
-
Making the Most of the Asset Manager
-
Working With Metadata in TAO
-
Configuring Interactions: What Possibilities do You Have?
-
Randomization in Items and Tests
-
All You Need to Know About Test-Takers
-
All About Deliveries
-
Setting up LTI
-
Proctoring Assessments in TAO
-
Interpreting Results Tables in TAO
-
Using the Advanced Search
-
Best Practices for Working with Multiple Users in a Small-scale Authoring Scenario Part 1: Set-up
-
Best Practices for Working with Multiple Users in a Small-scale Authoring Scenario Part 2: Workflow
-
Optimizing Pictures
-
All About Extensions
-
Stylesheets in Assessment Items
-
TAO for RTL Languages
-
TAO Terminology Explained Part 1: TAO Architecture
-
TAO Terminology Explained Part 2: Creating and Delivering Assessments
-
TAO Terminology Explained Part 3: Scoring Assessments
-
Test-taker and Accessibility tools
-
How does scoring work in TAO? (II)
-
Video demos
-
Video tutorials: Creating interactions
-
Thinking About Test Questions (and Choosing Interactions) According to Task Type
How do I create a delivery from an existing test?
Before test-takers can take the assessment you have prepared (as a session), the test needs to be selected as part of a delivery.
Follow the steps below to create a delivery:
- Choose a location for your new delivery.
To do this, click on the Deliveries icon in the Assessment Builder Bar. This will take you to the Deliveries page. On the left-hand side of your screen, you will see the Library of existing deliveries.
The last delivery which was created will be highlighted in the library.
Next, select the folder in the library in which you would like to store your new delivery.
- Create and save your delivery.
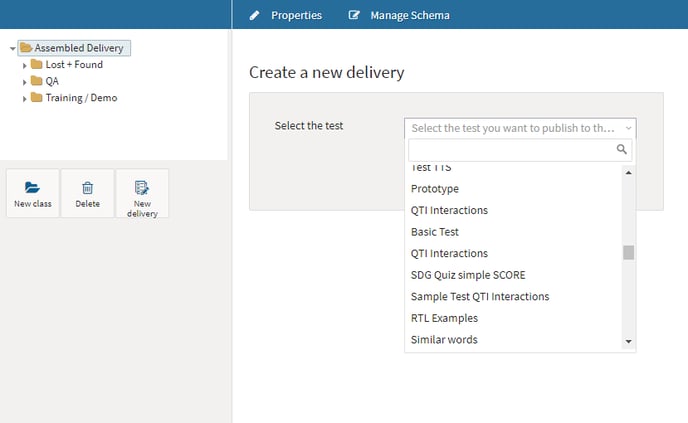
To do this, click on the New delivery icon in the button bank under the library, as shown in the image below.
Then, select the test you would like to publish from the drop-down menu, and click Publish.
Note: The default name of the delivery is 'Delivery of [TEST NAME]'. If necessary, this can be changed when setting the properties of the delivery in the next step, by specifying a different name as a Label.
Note: See the section Creating a Delivery in the User Guide for more details.
